

Help Centre
How to press TPU Patches:

Video
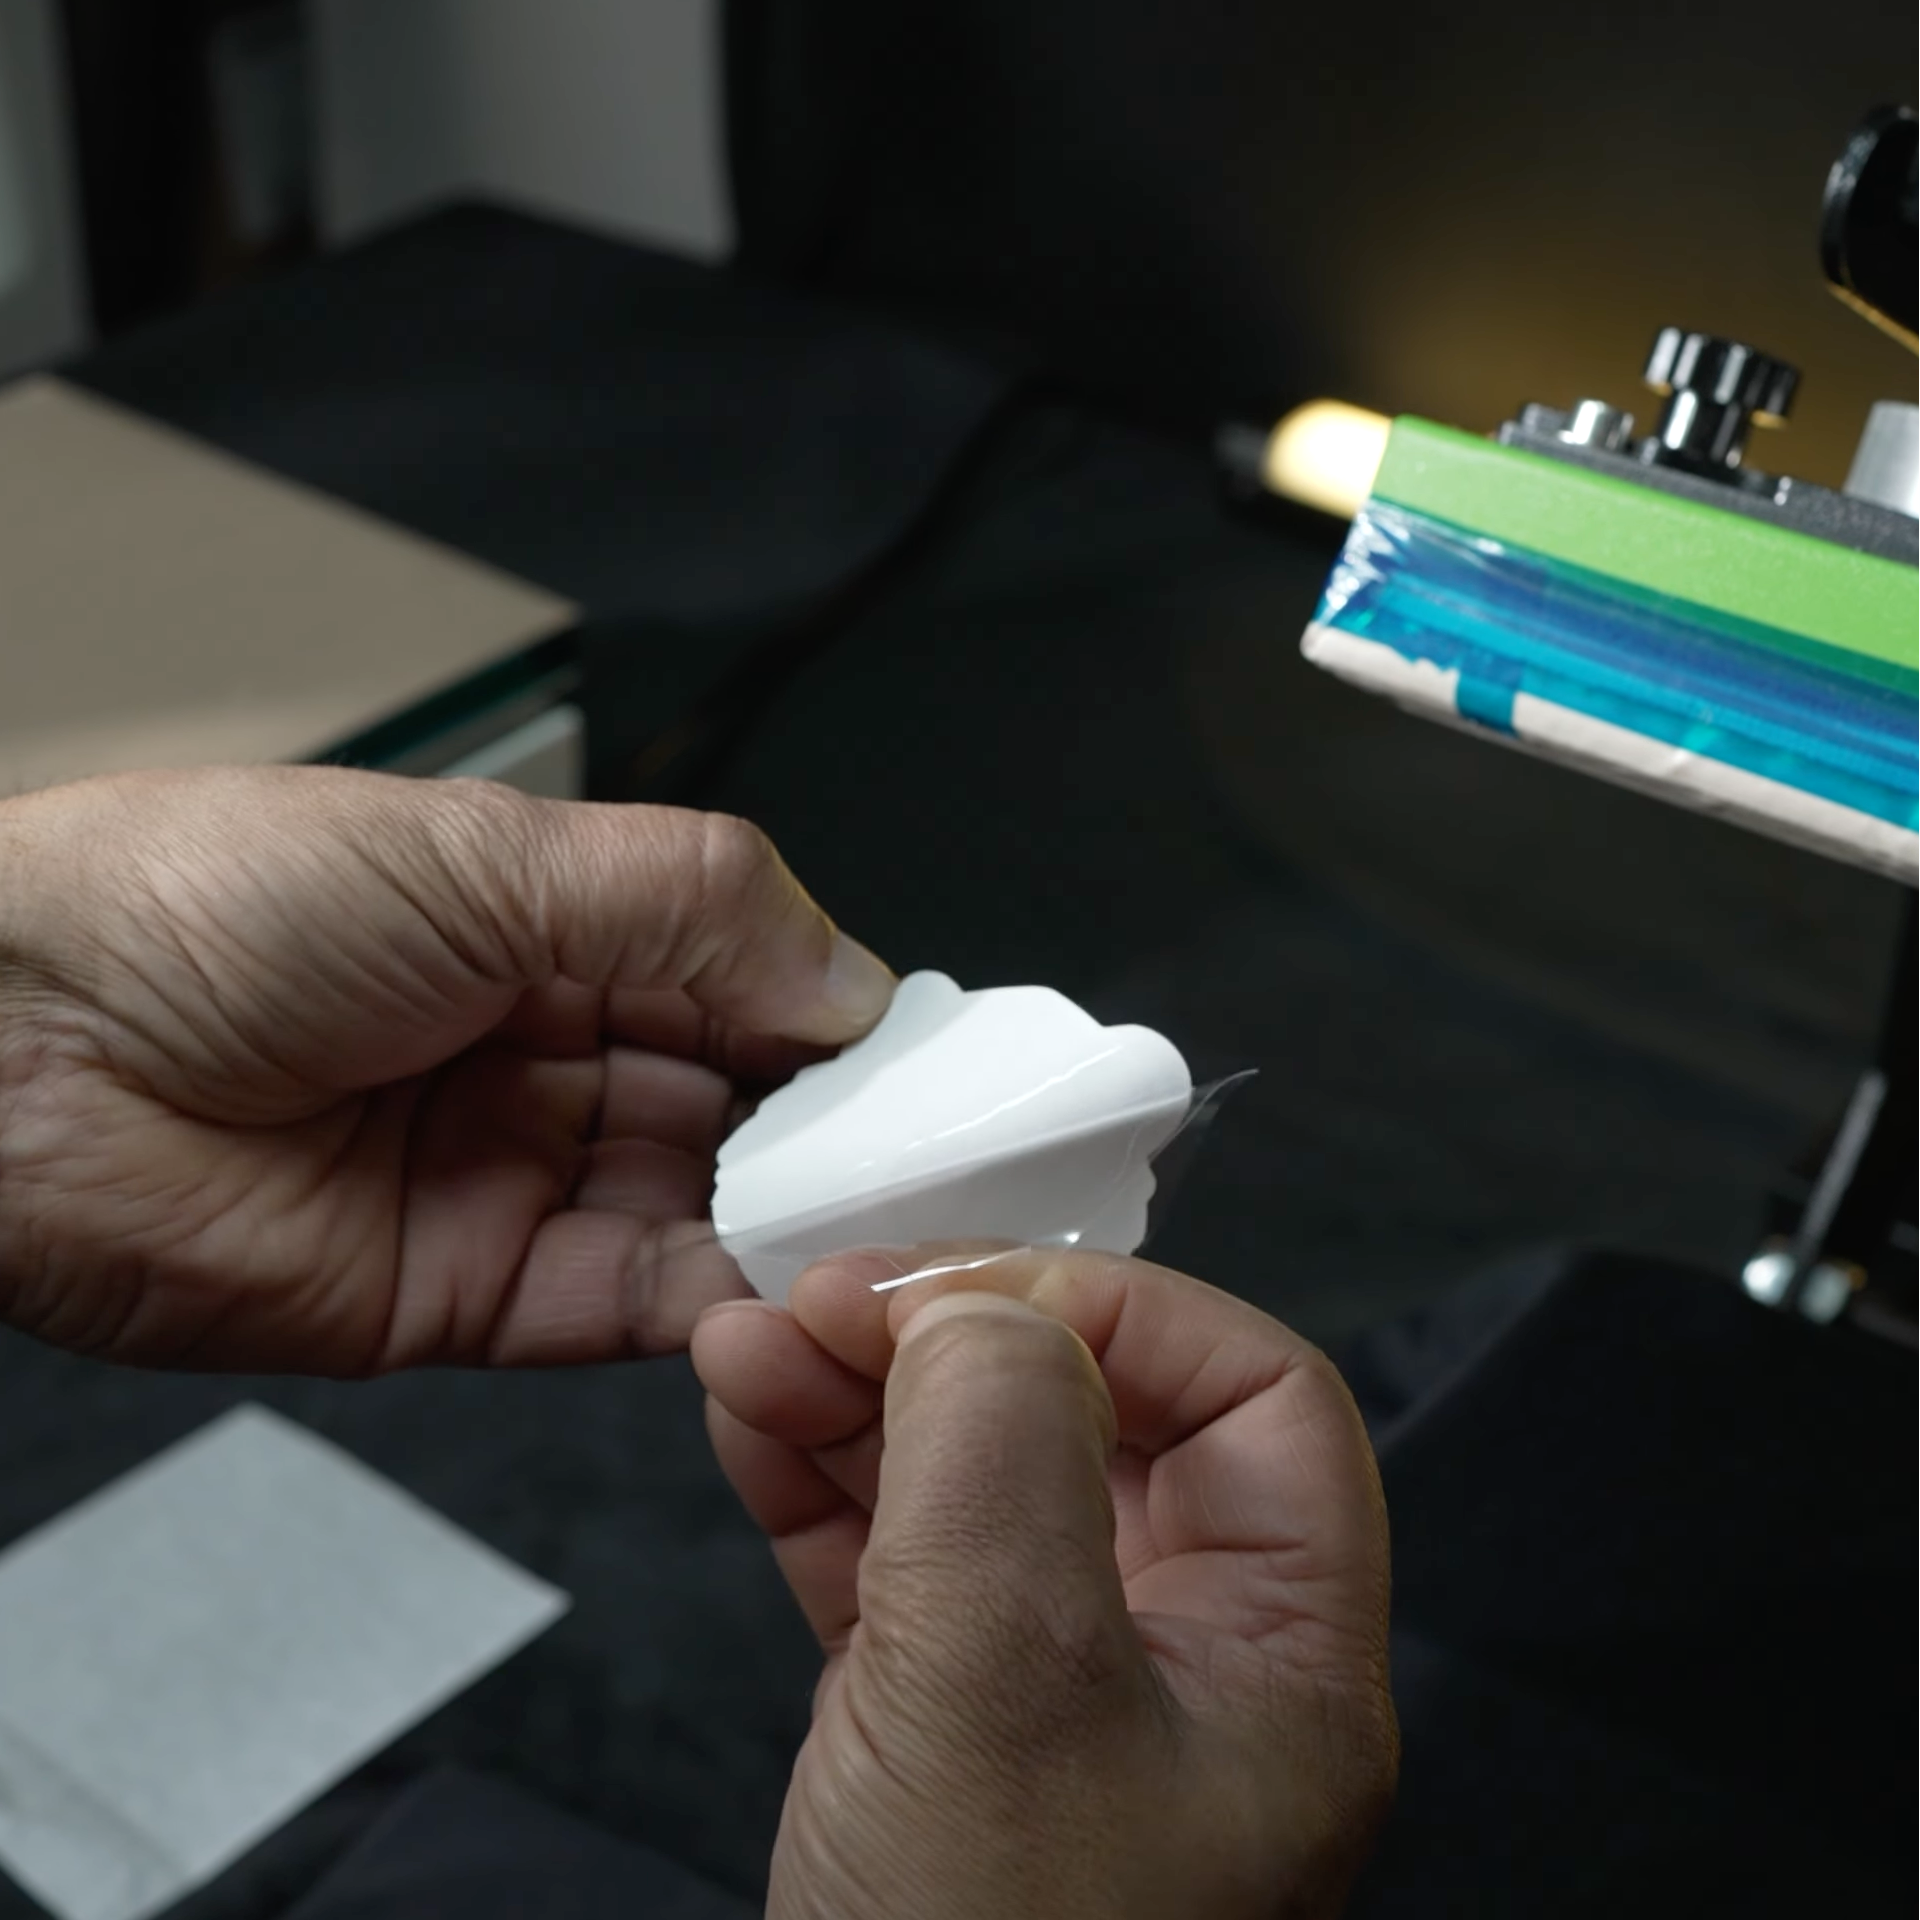
Peel & Position
Pre-press the garment for a few seconds to remove moisture and creases. Carefully peel the TPU transfer from the backing, then position it onto your garment.
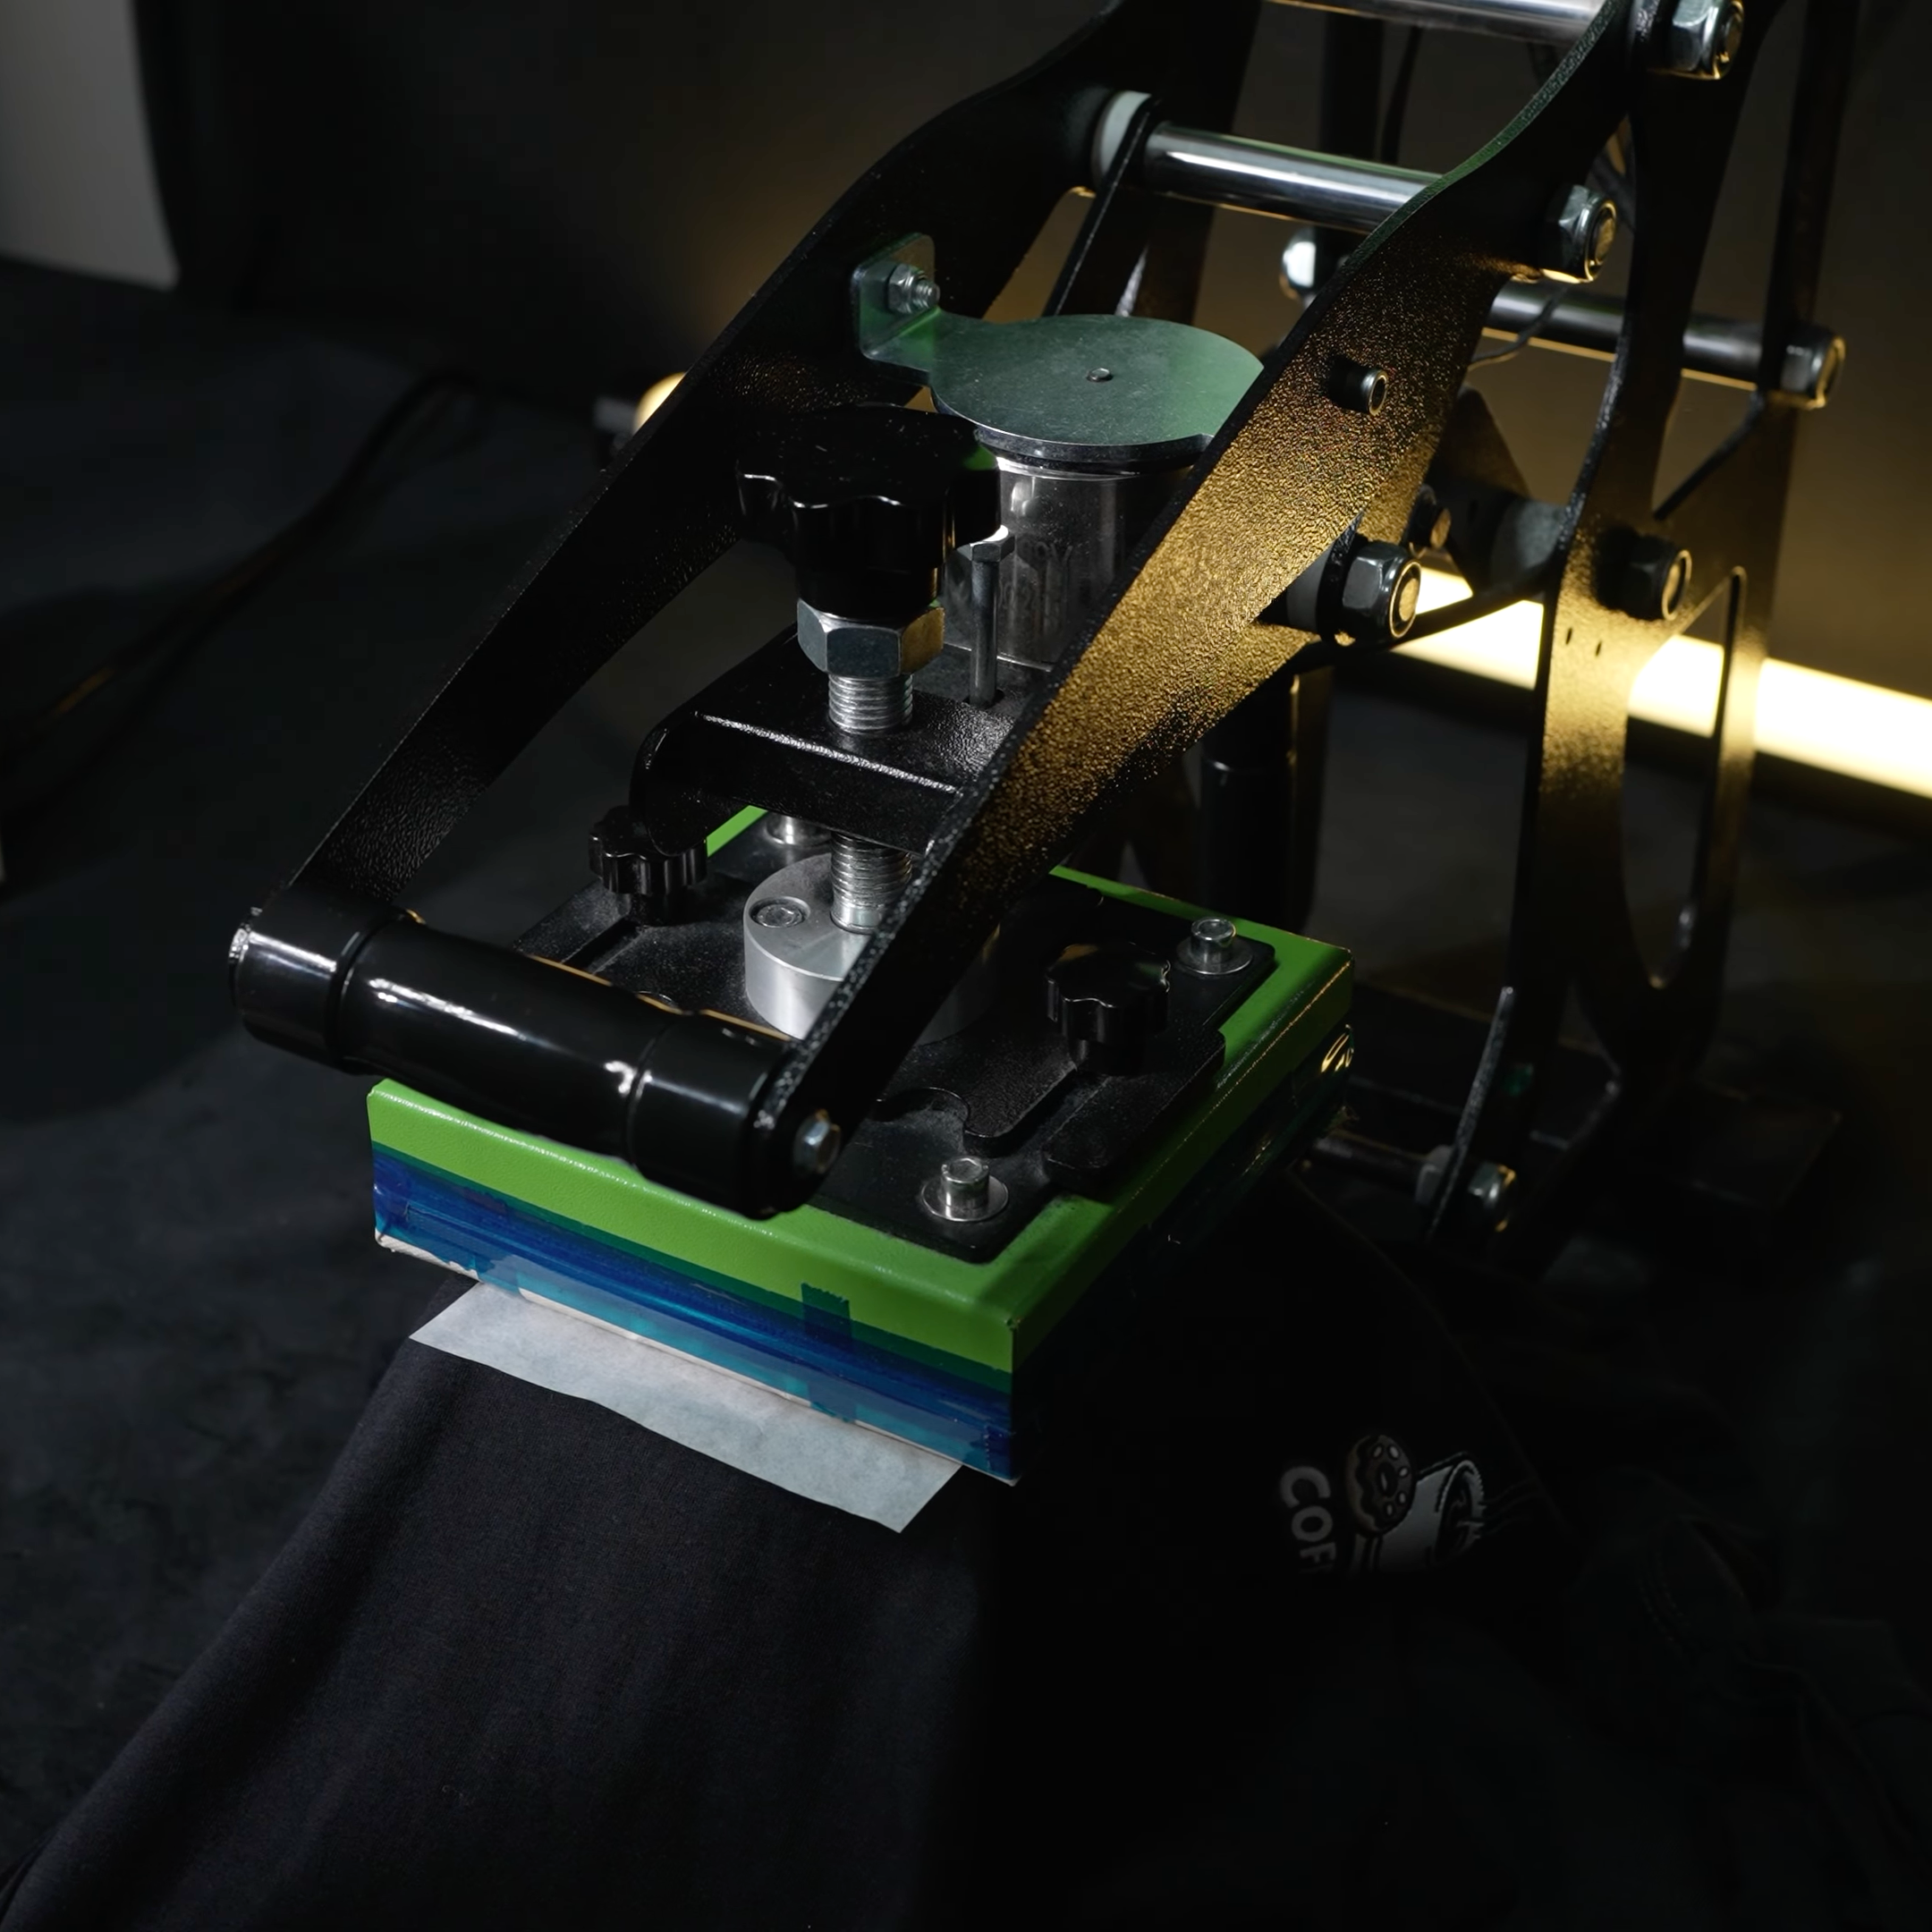
Cover & Press
Cover the transfer with silicone paper and press at 150°C for 15 seconds. For polyester, we recommend pressing at 140°C instead.
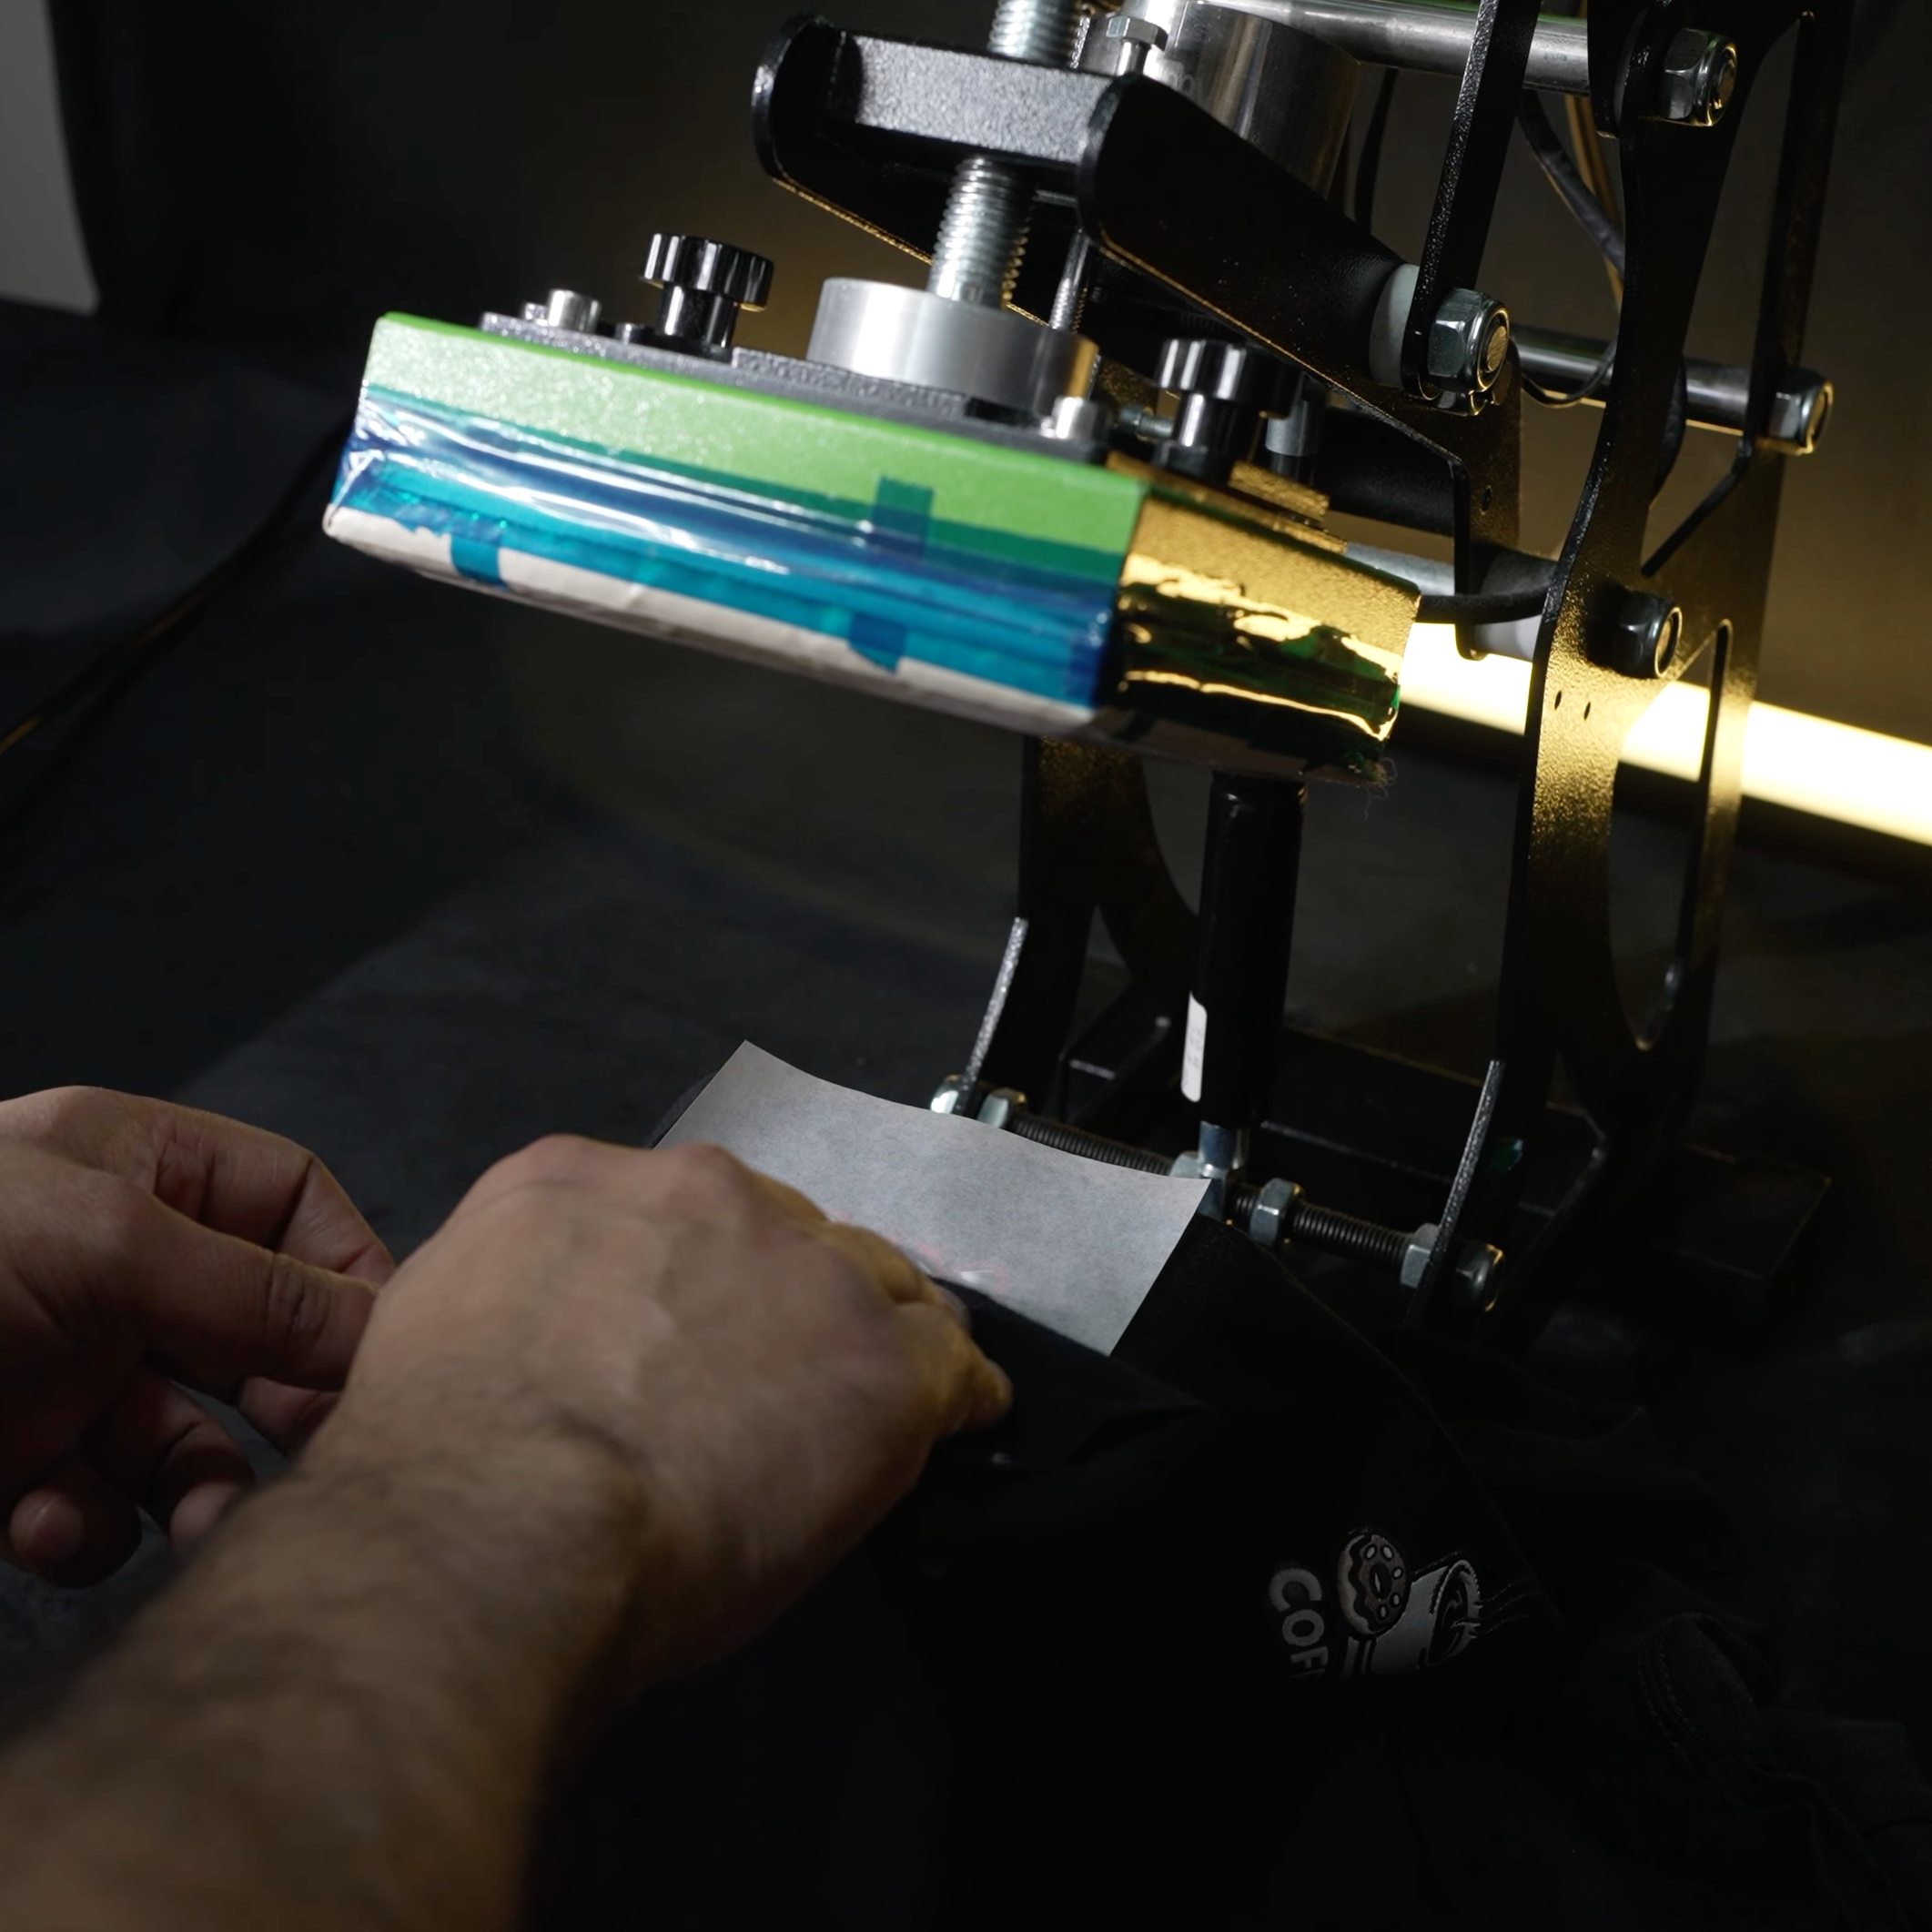
Rub & Pat Down
Once pressed, use the silicone paper to gently rub and pat down the transfer. This helps prevent curling and gives a clean, secure finish.
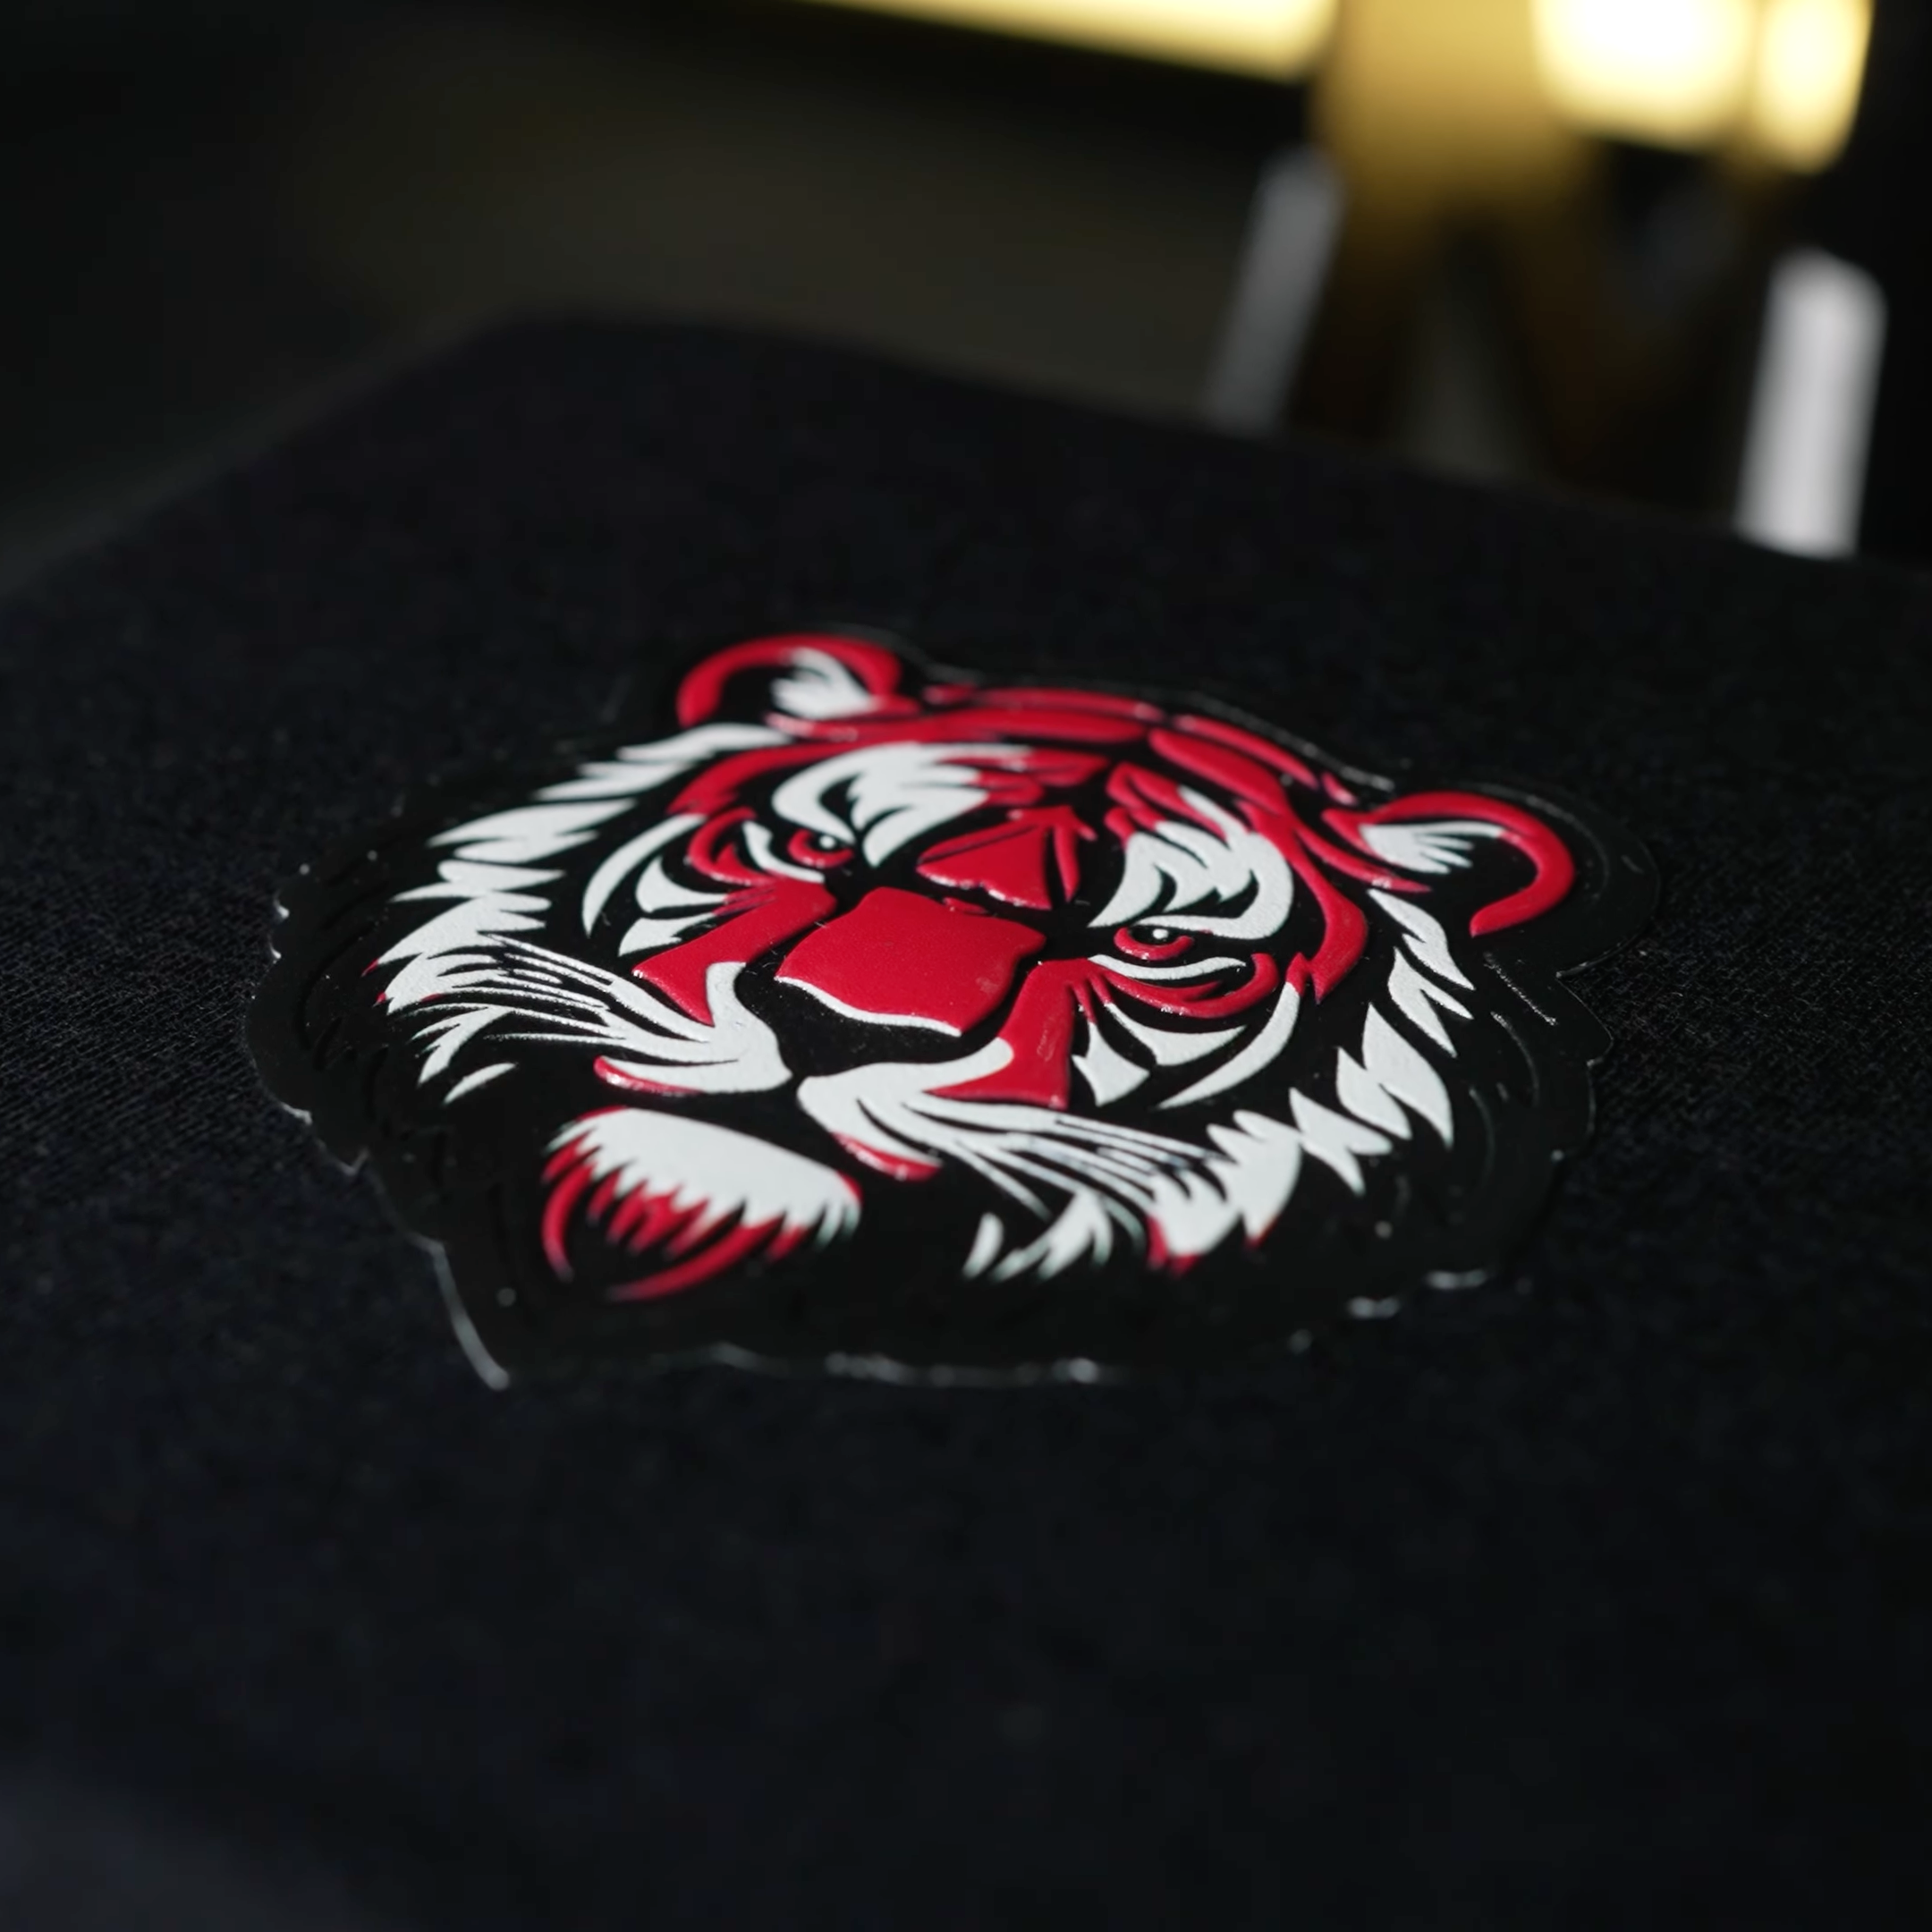
Raised TPU Finish
Your transfer is now applied with a premium raised, rubberised patch-style finish — all from one simple press.
Peel & Position
Pre-press the garment for a few seconds to remove moisture and creases. Carefully peel the TPU transfer from the backing, then position it onto your garment.
Cover & Press
Cover the transfer with silicone paper and press at 150°C for 15 seconds. For polyester, we recommend pressing at 140°C instead.
Rub & Pat Down
Once pressed, use the silicone paper to gently rub and pat down the transfer. This helps prevent curling and gives a clean, secure finish.
Raised TPU Finish
Your transfer is now applied with a premium raised, rubberised patch-style finish — all from one simple press.
Troubleshooting TPU Transfers
Application & Adhesion Issues
Transfer Not Sticking Properly
If the TPU transfer is not fully adhering to the garment, this is usually caused by low pressure, not enough heat, uneven contact, or an unsuitable fabric.
What to do:
- Lay the transfer back down in the same position.
- Cover again with silicone paper.
- Press again with slightly more pressure.
- If needed, increase the temperature slightly and test again.
- Make sure the heat press is applying even pressure across the full design.
For cotton, we recommend pressing at 150°C for 15 seconds.
For polyester, we recommend pressing at 140°C to reduce the risk of heat damage to the garment.
Always test first if you are unsure.
Edges Lifting After Pressing
If the edges of the TPU patch are lifting, it may need extra pressure or more contact time during application.
What to do:
- Cover the transfer with silicone paper.
- Re-press the design with firm, even pressure.
- Once pressed, gently rub and pat the transfer down through the silicone paper.
- Allow the transfer to cool before stretching, folding or handling heavily.
Make sure the garment is flat before pressing. Seams, zips, pockets and thick fabric areas can stop the press from applying even pressure.
Curling, Movement & Handling
Transfer Curling After Pressing
Some raised TPU areas may curl slightly if they are not pressed down properly after application.
What to do:
- Keep the silicone paper over the transfer after pressing.
- Gently rub and pat the transfer down while it is still warm.
- Focus on the raised edges and corners.
- Allow the garment to cool flat before handling.
This step helps the transfer settle into the garment and gives a cleaner finish.
Transfer Moving During Application
If the transfer shifts before or during pressing, the final placement may be affected.
What to do:
- Place the garment flat on the press.
- Pre-press the garment for a few seconds to remove moisture and creases.
- Position the TPU transfer carefully before pressing.
- Close the press gently to avoid air movement.
- Use heat-resistant tape if needed to hold the transfer in place.
Take extra care with small logos, sleeve placements, caps, bags and awkward garment areas.
Backing Difficult To Peel
If the transfer is difficult to peel from the backing before application, take your time and avoid pulling too quickly.
What to do:
- Peel slowly from one corner.
- Keep the transfer flat while peeling.
- Avoid bending or folding the raised areas.
- If a small detail lifts, place it back down carefully before pressing.
Raised TPU transfers are more structured than standard flat transfers, so careful handling before pressing is important.
Garment Suitability & Heat Marks
Garment Marks Or Heat Press Imprints
Some garments may show press marks, shine or heat imprints after pressing, especially polyester, nylon, coated fabrics or delicate materials.
What to do:
- Use silicone paper or a protective cover sheet.
- Reduce the temperature for polyester or heat-sensitive fabrics.
- Test on the garment before applying to a final product.
- Avoid pressing directly over seams, zips or thick raised areas.
- Do not over-press the garment.
TPU transfers require heat and pressure, so it is important to make sure the garment is suitable before production.
Transfer Cracking Or Splitting
TPU transfers are raised and flexible, but they are not the same as flat DTF. Excessive stretching, incorrect application or unsuitable garment placement can affect the finish.
What to check:
- Was the transfer pressed with enough pressure?
- Was the correct temperature used?
- Was the transfer applied to a suitable fabric?
- Was the garment stretched heavily after application?
- Was the item washed or dried on high heat?
Avoid placing raised TPU transfers across areas that stretch heavily, such as tight-fitting chest areas, elbows, knees or highly elastic fabric zones.
Artwork & Finish Issues
Artwork Details Not As Expected
TPU 3D High Build is a raised patch-style product, so not every design will behave the same as standard DTF.
Very fine lines, tiny text, gradients, soft fades or complex details may not produce cleanly as raised TPU.
To get the best result:
- Use bold shapes and clear lines.
- Avoid very small text.
- Avoid thin strokes where possible.
- Use a die-cut background or outline.
- Tell us in the notes box which areas should be raised, gloss, different thicknesses or specific colours.
If no notes are supplied, our designer will choose the most suitable raised finish based on the artwork provided.
Washing & Aftercare
Design Peeling After Washing
If a TPU transfer peels after washing, it may be caused by incorrect pressing, washing too soon after application, high heat drying or harsh washing conditions.
Best care advice:
- Wait at least 24 hours before washing after application.
- Wash garments inside out.
- Use a cool or gentle wash cycle.
- Avoid bleach and harsh detergents.
- Do not dry clean.
- Avoid high heat tumble drying.
- Air dry where possible or tumble dry on low heat.
- Do not iron directly over the TPU transfer.
Correct pressing and gentle aftercare will help extend the life of the transfer.
Wash & Care Guide
For best results and longer-lasting TPU transfers:
- Wash inside out.
- Wash cold or on a gentle cycle.
- Avoid bleach.
- Avoid harsh detergents.
- Do not dry clean.
- Avoid high heat tumble drying.
- Do not iron directly over the transfer.
- Allow the transfer to fully cool before folding or packing.
Like most garment decoration methods, TPU transfers will last longer with careful washing and lower heat aftercare.
Transfer Not Sticking Properly
If the TPU transfer is not fully adhering to the garment, this is usually caused by low pressure, not enough heat, uneven contact, or an unsuitable fabric.
What to do:
- Lay the transfer back down in the same position.
- Cover again with silicone paper.
- Press again with slightly more pressure.
- If needed, increase the temperature slightly and test again.
- Make sure the heat press is applying even pressure across the full design.
For cotton, we recommend pressing at 150°C for 15 seconds.
For polyester, we recommend pressing at 140°C to reduce the risk of heat damage to the garment.
Always test first if you are unsure.
Edges Lifting After Pressing
If the edges of the TPU patch are lifting, it may need extra pressure or more contact time during application.
What to do:
- Cover the transfer with silicone paper.
- Re-press the design with firm, even pressure.
- Once pressed, gently rub and pat the transfer down through the silicone paper.
- Allow the transfer to cool before stretching, folding or handling heavily.
Make sure the garment is flat before pressing. Seams, zips, pockets and thick fabric areas can stop the press from applying even pressure.
Transfer Curling After Pressing
Some raised TPU areas may curl slightly if they are not pressed down properly after application.
What to do:
- Keep the silicone paper over the transfer after pressing.
- Gently rub and pat the transfer down while it is still warm.
- Focus on the raised edges and corners.
- Allow the garment to cool flat before handling.
This step helps the transfer settle into the garment and gives a cleaner finish.
Transfer Moving During Application
If the transfer shifts before or during pressing, the final placement may be affected.
What to do:
- Place the garment flat on the press.
- Pre-press the garment for a few seconds to remove moisture and creases.
- Position the TPU transfer carefully before pressing.
- Close the press gently to avoid air movement.
- Use heat-resistant tape if needed to hold the transfer in place.
Take extra care with small logos, sleeve placements, caps, bags and awkward garment areas.
Backing Difficult To Peel
If the transfer is difficult to peel from the backing before application, take your time and avoid pulling too quickly.
What to do:
- Peel slowly from one corner.
- Keep the transfer flat while peeling.
- Avoid bending or folding the raised areas.
- If a small detail lifts, place it back down carefully before pressing.
Raised TPU transfers are more structured than standard flat transfers, so careful handling before pressing is important.
Garment Marks Or Heat Press Imprints
Some garments may show press marks, shine or heat imprints after pressing, especially polyester, nylon, coated fabrics or delicate materials.
What to do:
- Use silicone paper or a protective cover sheet.
- Reduce the temperature for polyester or heat-sensitive fabrics.
- Test on the garment before applying to a final product.
- Avoid pressing directly over seams, zips or thick raised areas.
- Do not over-press the garment.
TPU transfers require heat and pressure, so it is important to make sure the garment is suitable before production.
Transfer Cracking Or Splitting
TPU transfers are raised and flexible, but they are not the same as flat DTF. Excessive stretching, incorrect application or unsuitable garment placement can affect the finish.
What to check:
- Was the transfer pressed with enough pressure?
- Was the correct temperature used?
- Was the transfer applied to a suitable fabric?
- Was the garment stretched heavily after application?
- Was the item washed or dried on high heat?
Avoid placing raised TPU transfers across areas that stretch heavily, such as tight-fitting chest areas, elbows, knees or highly elastic fabric zones.
Artwork Details Not As Expected
TPU 3D High Build is a raised patch-style product, so not every design will behave the same as standard DTF.
Very fine lines, tiny text, gradients, soft fades or complex details may not produce cleanly as raised TPU.
To get the best result:
- Use bold shapes and clear lines.
- Avoid very small text.
- Avoid thin strokes where possible.
- Use a die-cut background or outline.
- Tell us in the notes box which areas should be raised, gloss, different thicknesses or specific colours.
If no notes are supplied, our designer will choose the most suitable raised finish based on the artwork provided.
Design Peeling After Washing
If a TPU transfer peels after washing, it may be caused by incorrect pressing, washing too soon after application, high heat drying or harsh washing conditions.
Best care advice:
- Wait at least 24 hours before washing after application.
- Wash garments inside out.
- Use a cool or gentle wash cycle.
- Avoid bleach and harsh detergents.
- Do not dry clean.
- Avoid high heat tumble drying.
- Air dry where possible or tumble dry on low heat.
- Do not iron directly over the TPU transfer.
Correct pressing and gentle aftercare will help extend the life of the transfer.
Wash & Care Guide
For best results and longer-lasting TPU transfers:
- Wash inside out.
- Wash cold or on a gentle cycle.
- Avoid bleach.
- Avoid harsh detergents.
- Do not dry clean.
- Avoid high heat tumble drying.
- Do not iron directly over the transfer.
- Allow the transfer to fully cool before folding or packing.
Like most garment decoration methods, TPU transfers will last longer with careful washing and lower heat aftercare.
How to order TPU Patches:

Video

Choose Your Product
Select Breast / Sleeve Logos for designs up to 10cm, or Chest / Back Prints for larger designs above 10cm.
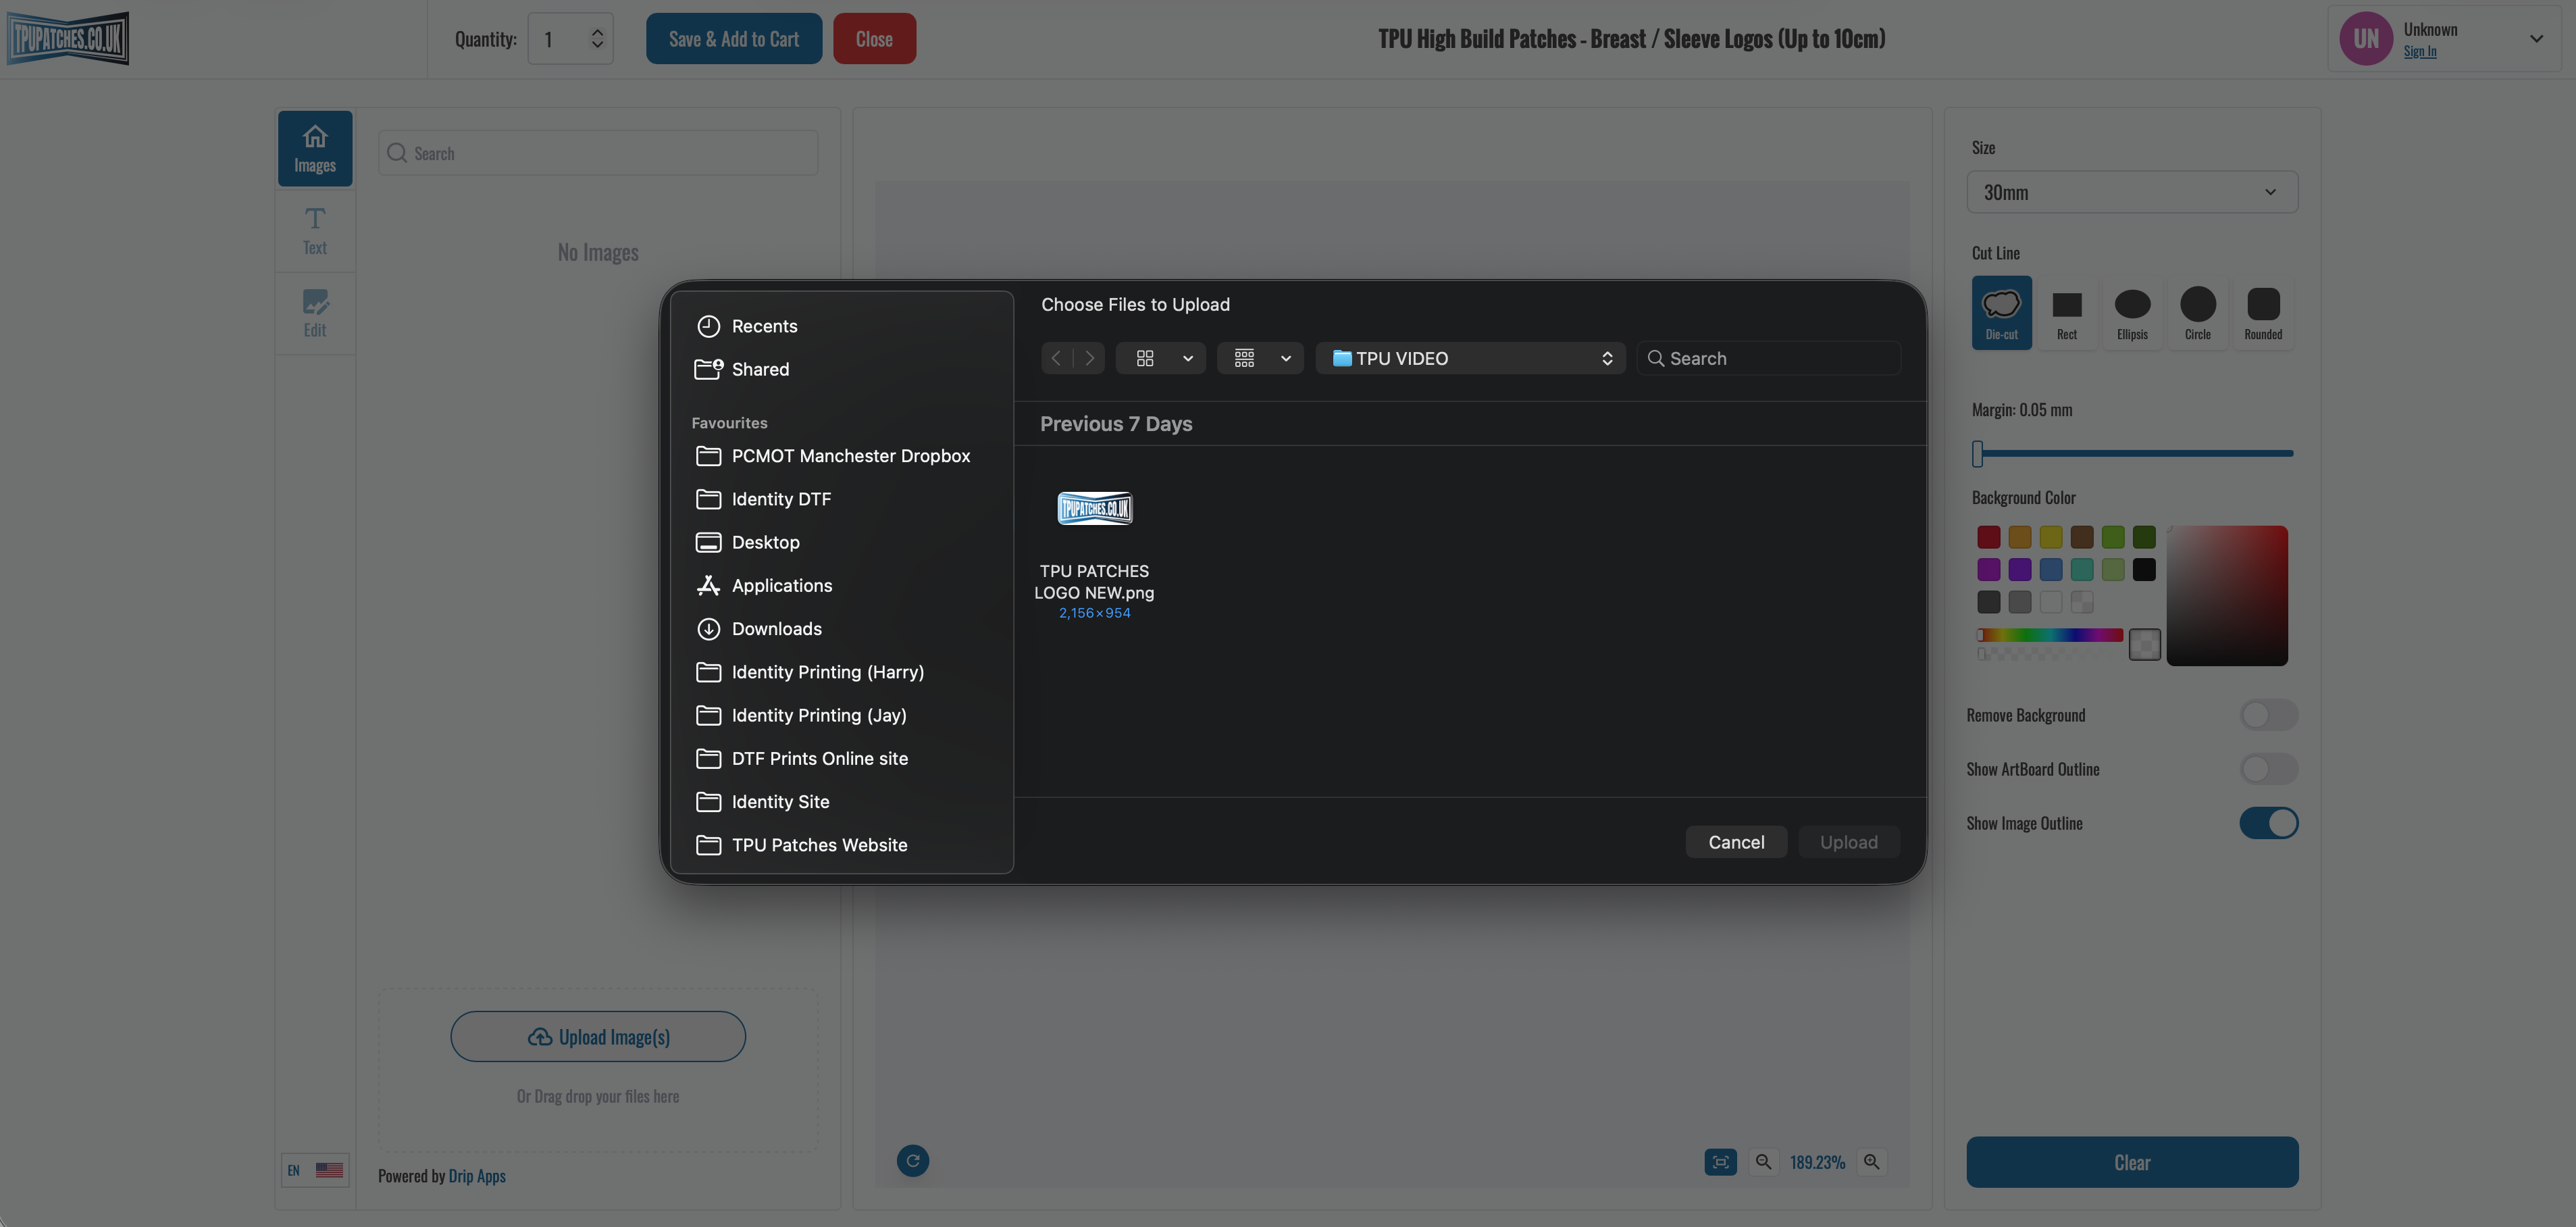
Upload Your Artwork
Open the artwork builder and upload the logo or design you would like us to produce.
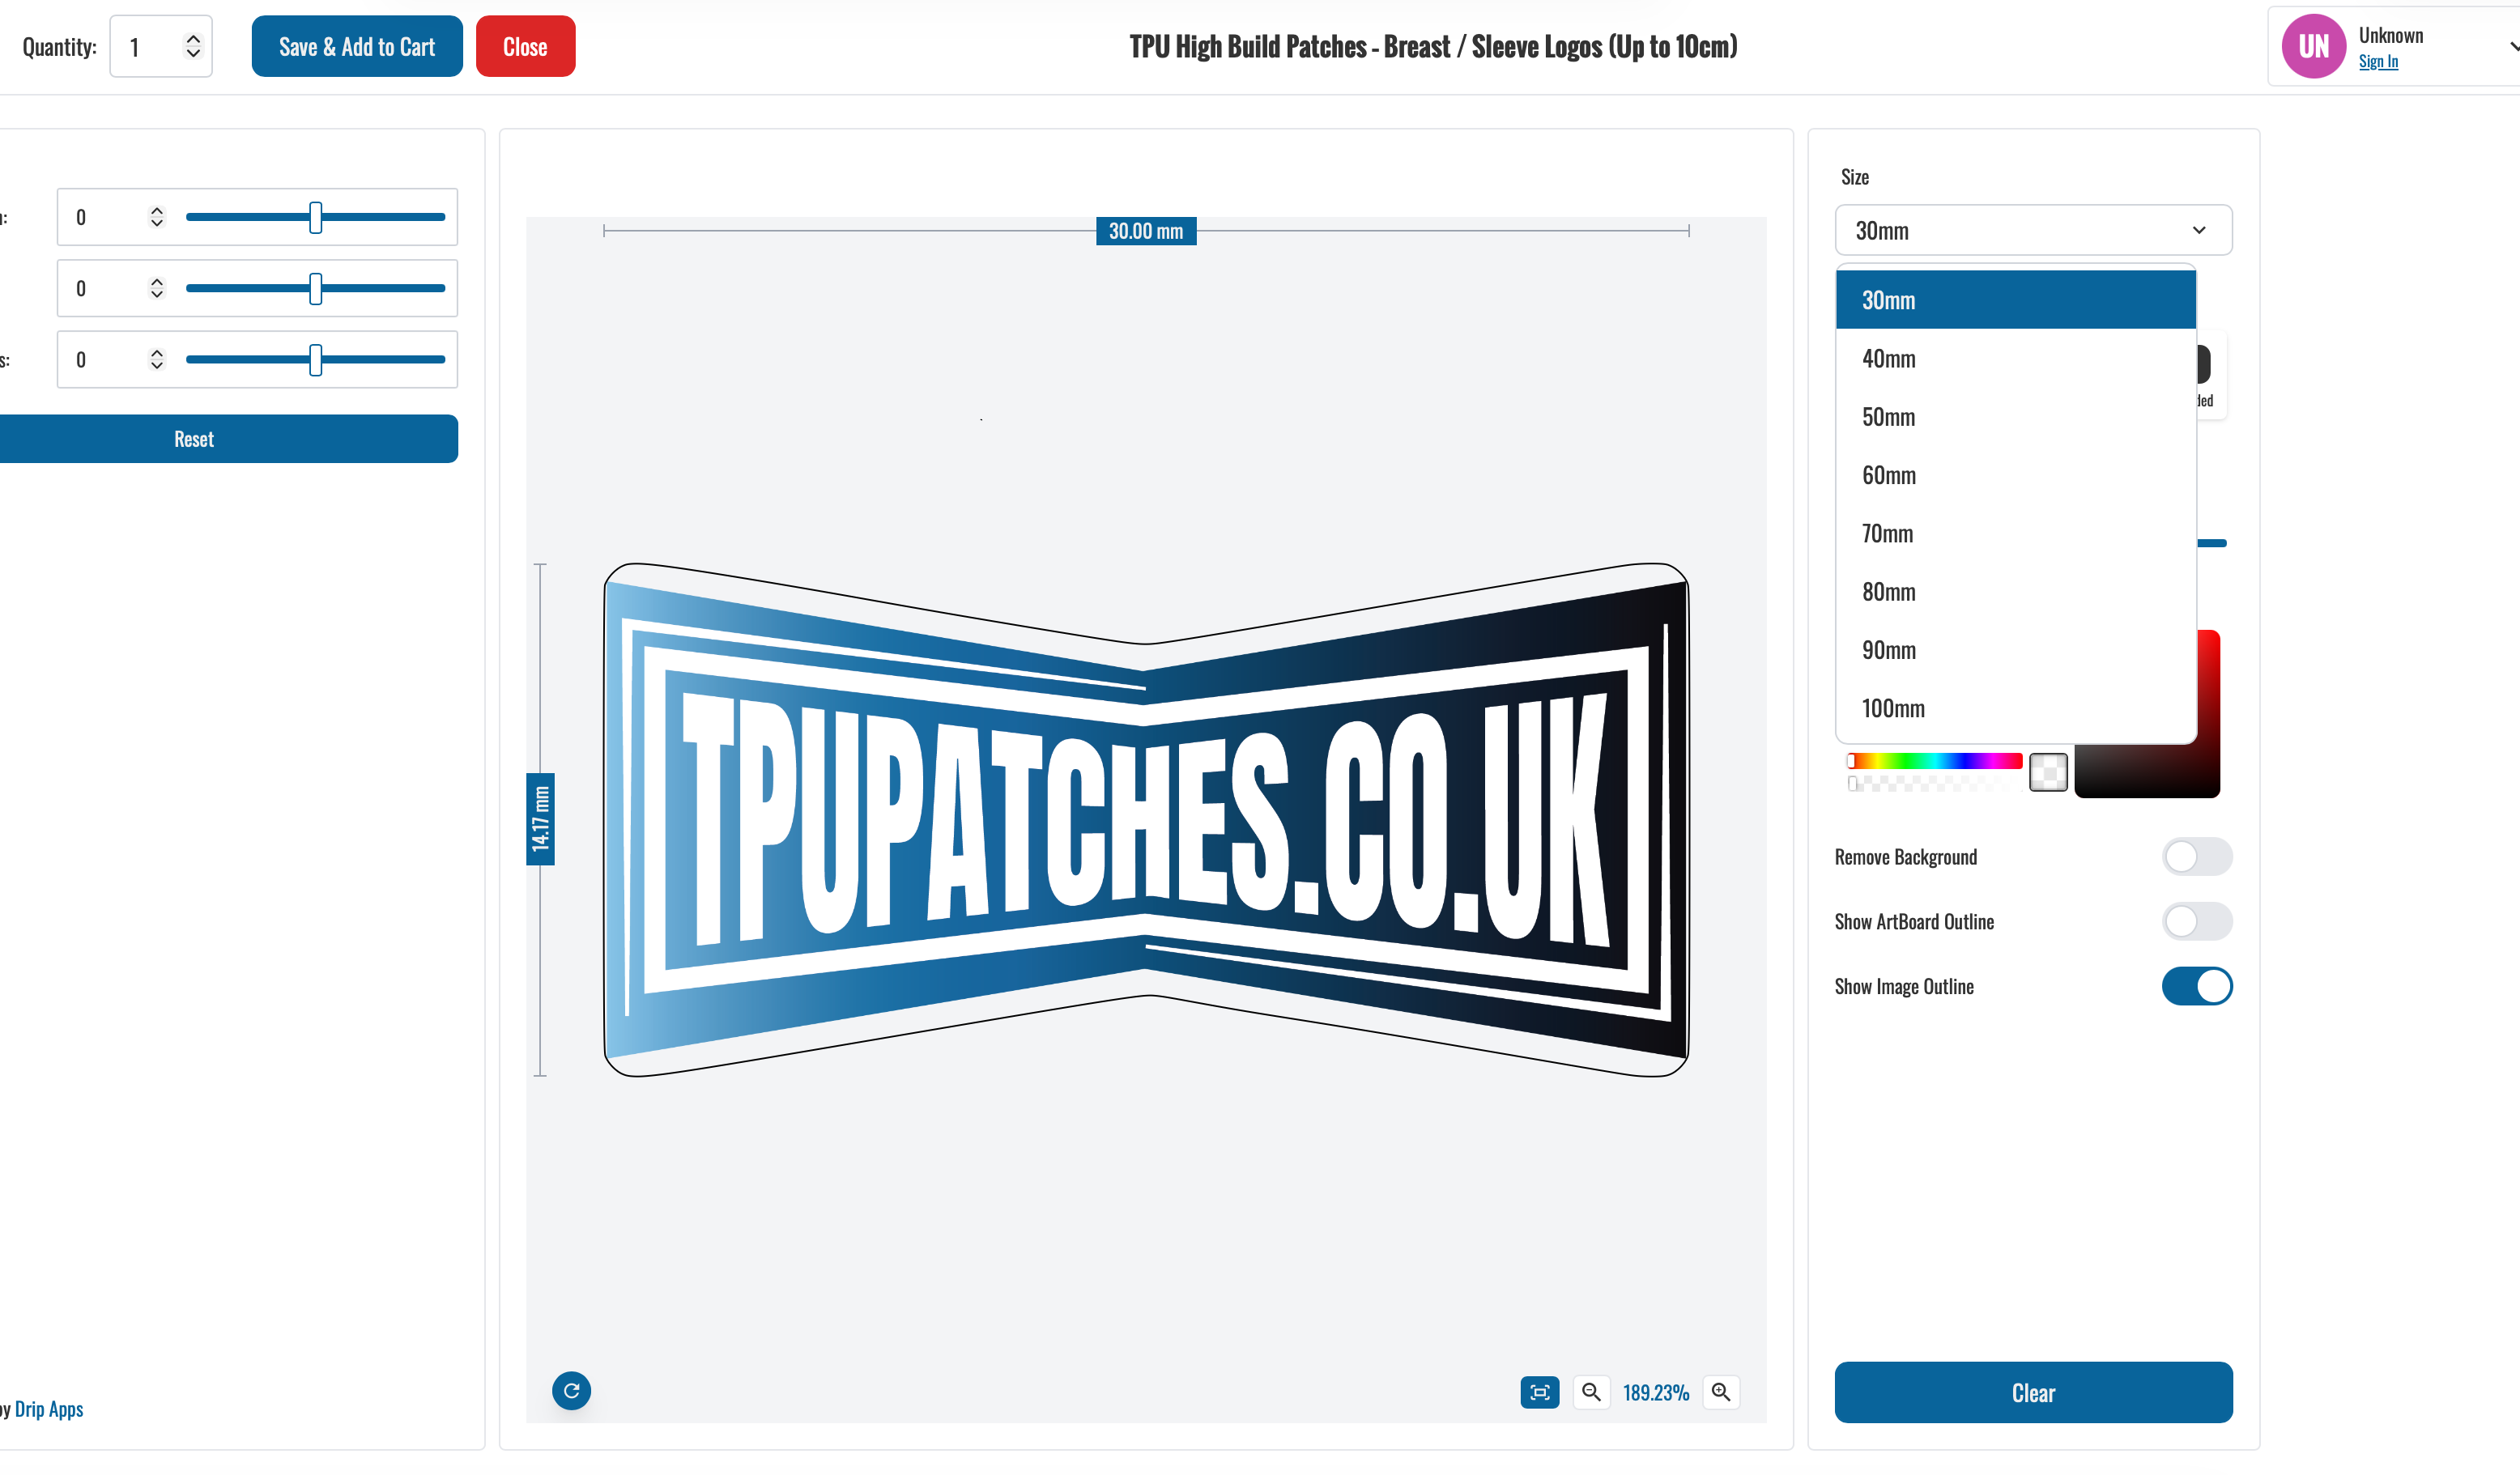
Choose Size & Quantity
Select your required finished size, position your artwork and enter the number of patches you need.
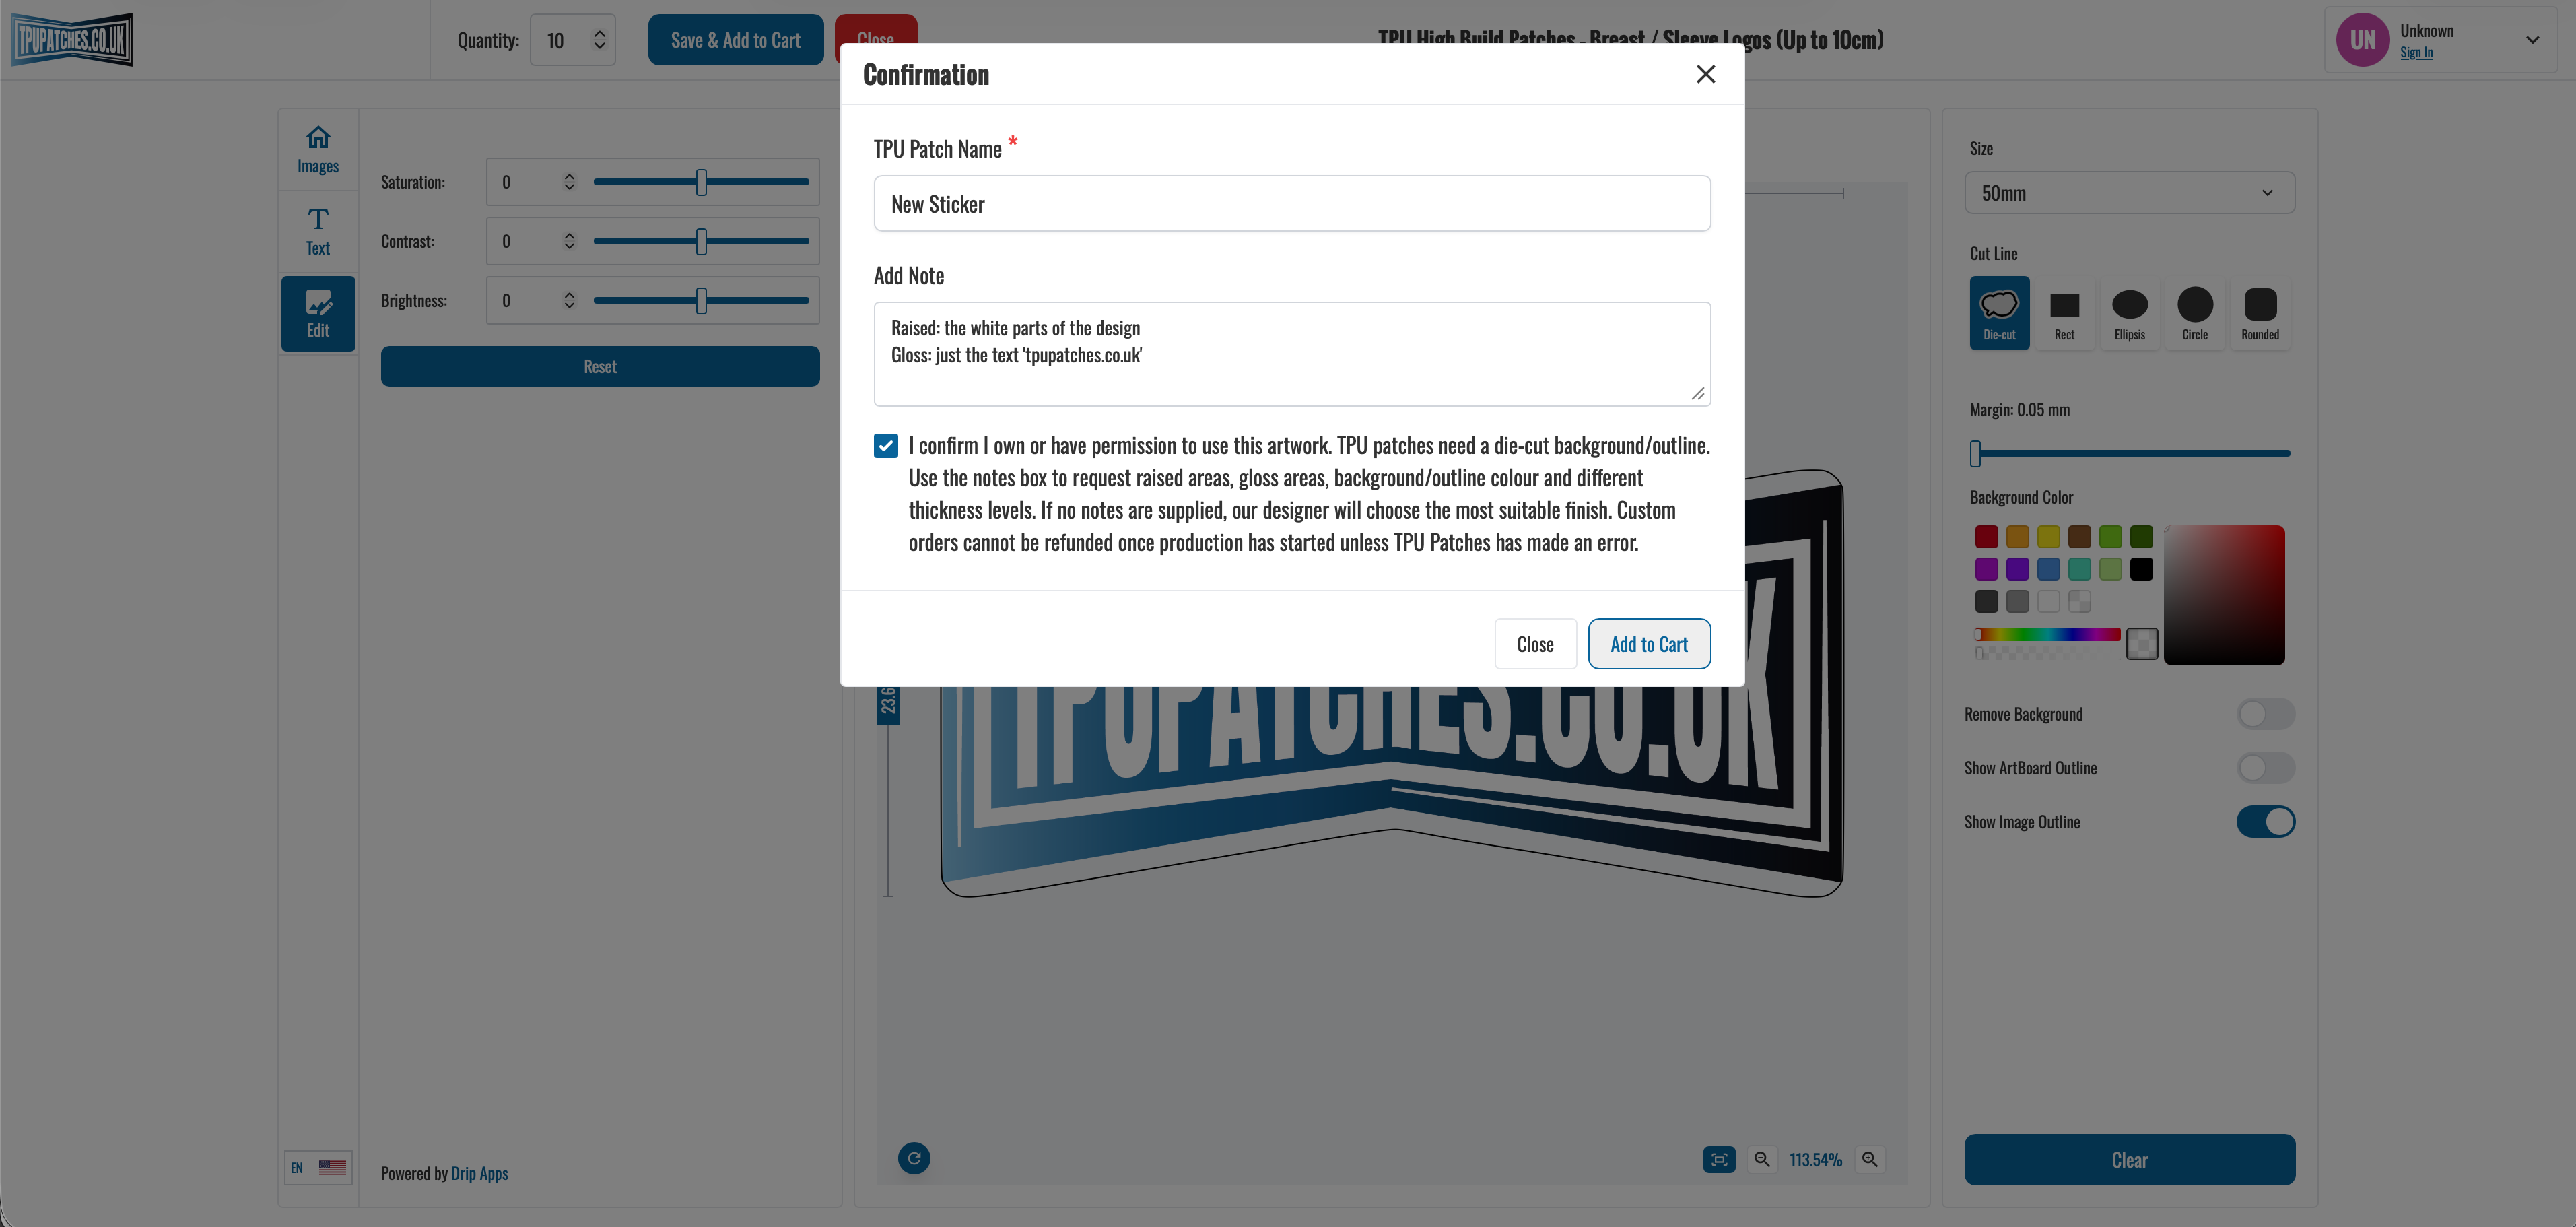
Add To Cart
Check your artwork, size and quantity, then add your design to the basket. You can also tell us which areas you want raised or glossy, or leave the finish to our design team.
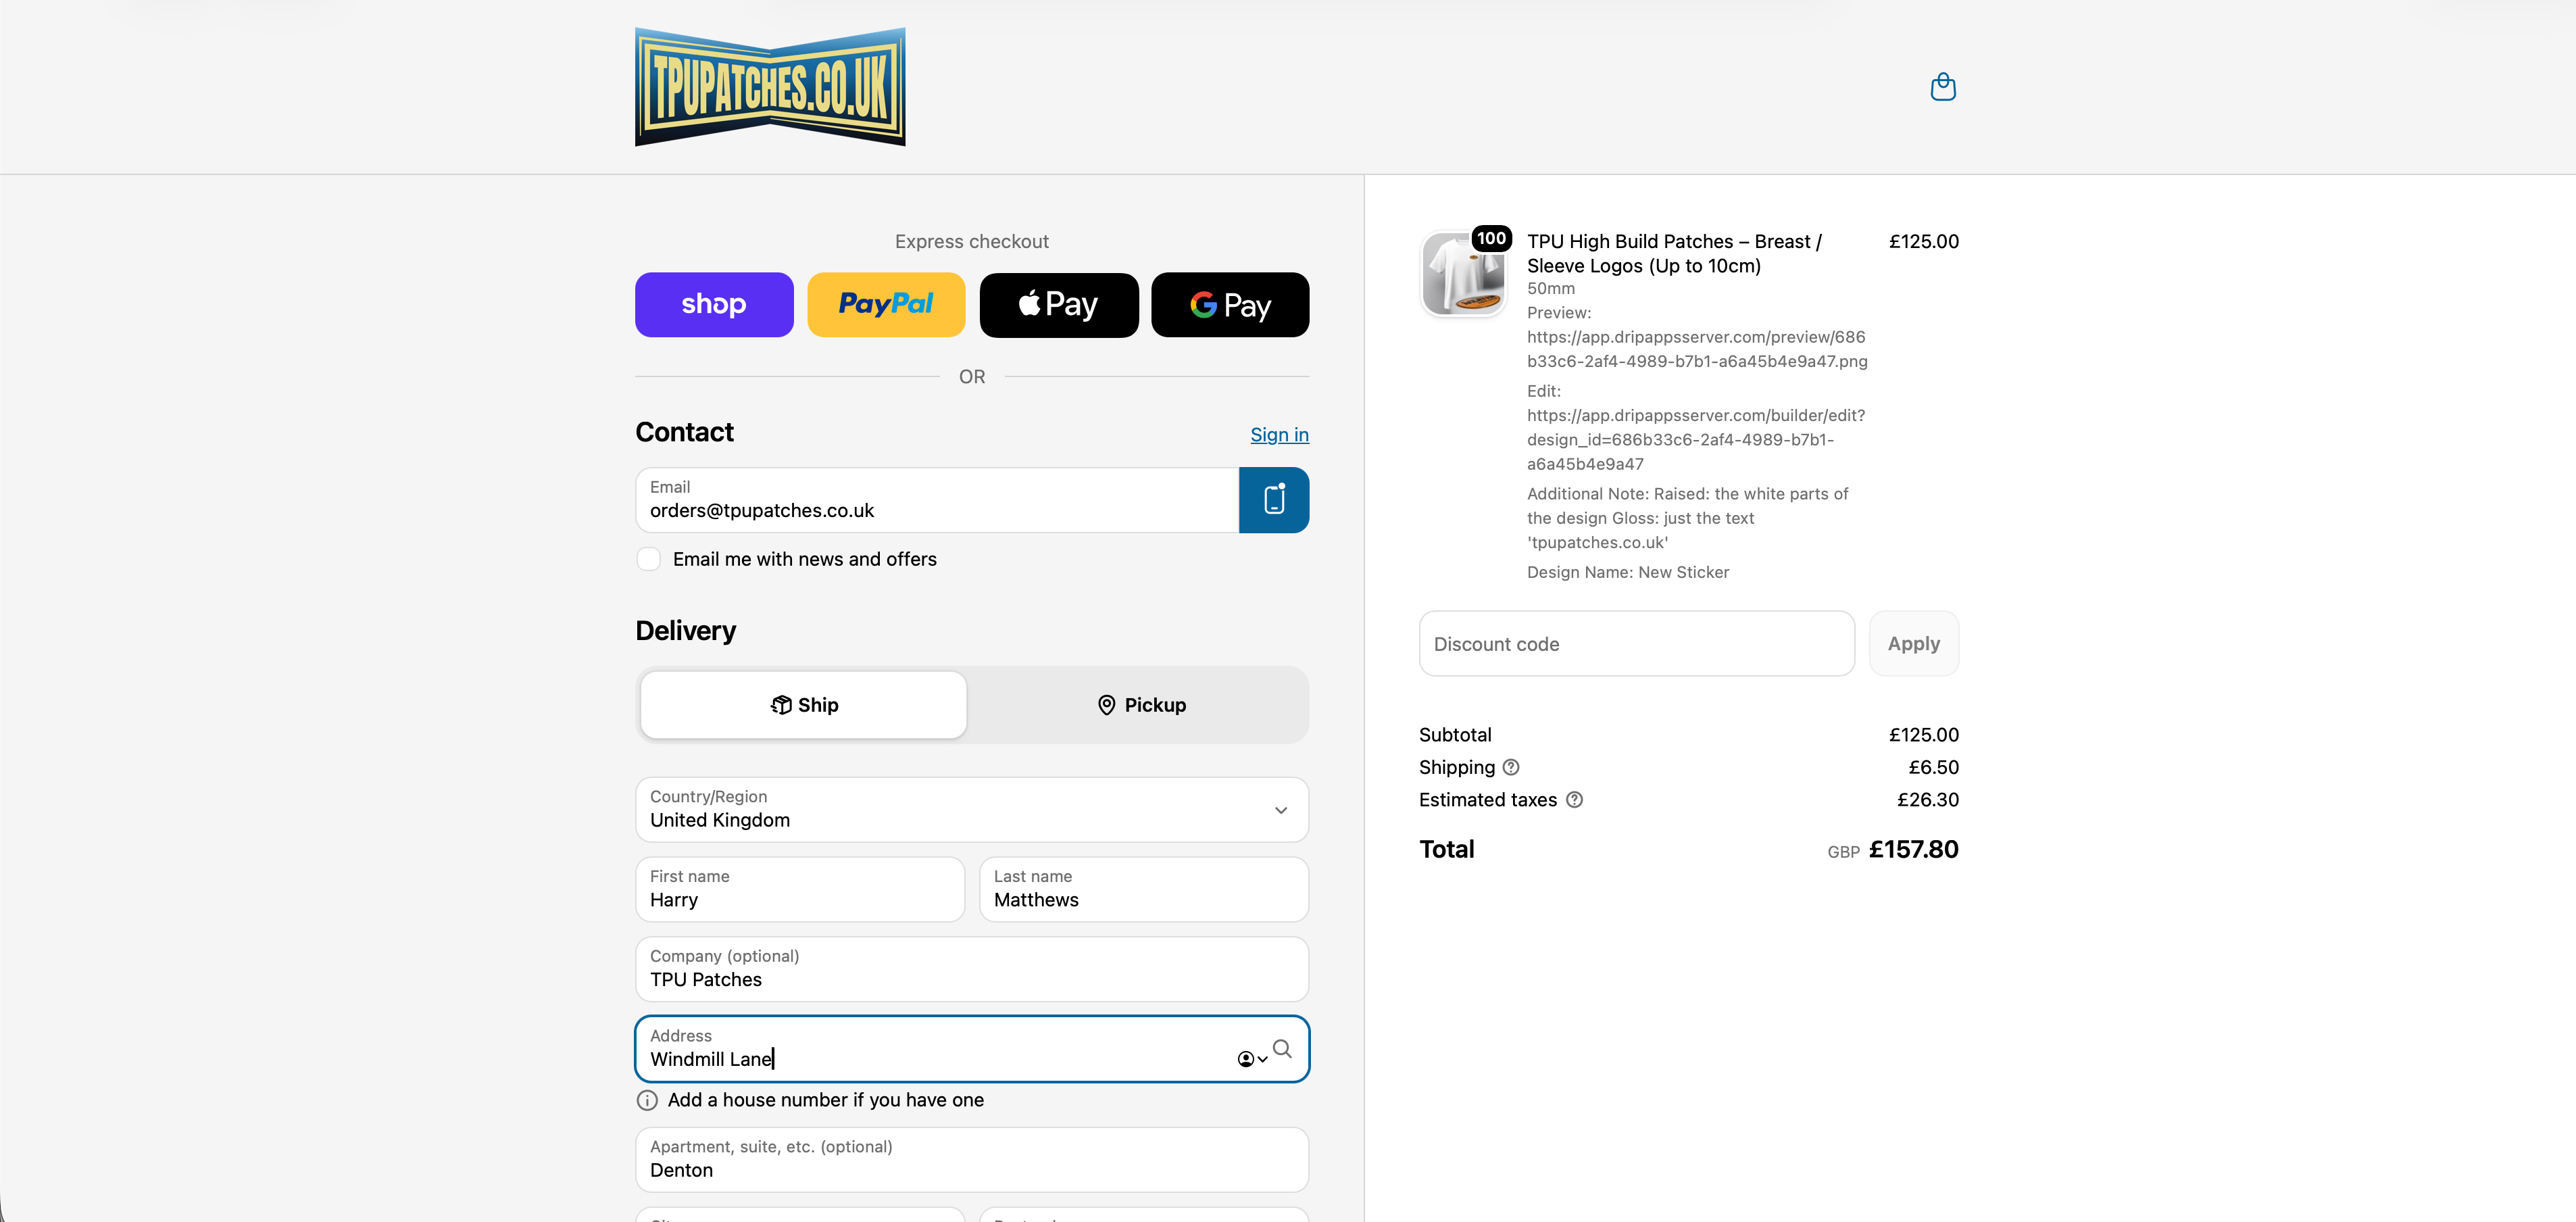
Complete Checkout
Enter your contact, delivery and payment details, review your order and select Place Order. Your confirmation and invoice will be sent by email.
Choose Your Product
Select Breast / Sleeve Logos for designs up to 10cm, or Chest / Back Prints for larger designs above 10cm.
Upload Your Artwork
Open the artwork builder and upload the logo or design you would like us to produce.
Choose Size & Quantity
Select your required finished size, position your artwork and enter the number of patches you need.
Add To Cart
Check your artwork, size and quantity, then add your design to the basket. You can also tell us which areas you want raised or glossy, or leave the finish to our design team.
Complete Checkout
Enter your contact, delivery and payment details, review your order and select Place Order. Your confirmation and invoice will be sent by email.
Troubleshooting Ordering TPU
Artwork Upload Issues
Artwork Will Not Upload
This may happen if the file is too large, unsupported or has not finished loading correctly.
What to do:
- Use a high-quality PNG, PDF, SVG, AI or EPS file.
- Check that the file is not unusually large.
- Refresh the page and upload the artwork again.
- Try using another browser or device.
- Avoid screenshots, blurry images or damaged files.
Background Removal Does Not Look Right
Automatic background removal may struggle with shadows, fine details, low-resolution images or similar colours between the artwork and background.
What to do:
- Upload a transparent PNG where possible.
- Check around small text, thin lines and detailed edges.
- Try using a higher-quality version of the artwork.
- Contact us before ordering if the artwork requires additional preparation.
Size & Artwork Setup
Artwork Does Not Fit The Selected Size
This may happen when the artwork contains empty space or has different proportions from the selected size.
What to do:
- Turn on Keep Aspect Ratio to prevent stretching.
- Crop unnecessary empty space around the artwork.
- Resize the artwork within the available artboard.
- Choose a different finished size if required.
The Die-Cut Outline Looks Different Than Expected
The image outline and margin line are rough visual guides. They are not an exact production cut line.
What to do:
- Use the margin control to adjust the approximate space around the artwork.
- Use Show Image Outline to preview the expected shape.
- Keep important text and details away from the outside edge.
- Remember that our design team may refine the cut line to create a cleaner result.
Quantity, Price & Cart Issues
Quantity Or Price Is Not Updating
The builder may need a moment to calculate the price after changes are made.
What to do:
- Confirm that a finished size has been selected.
- Enter the quantity in the correct quantity box.
- Click away from the box and allow the price to update.
- Refresh the builder and try again if nothing changes.
Design Will Not Add To Cart
This usually means that a required option has not been completed.
What to do:
- Make sure the artwork has finished uploading.
- Select a finished size and quantity.
- Check that the design is positioned inside the artboard.
- Read and tick any required confirmation box.
- Refresh the page and rebuild the design if the issue continues.
Checkout Issues
Checkout Will Not Complete
Checkout may not continue if required information is missing or the payment cannot be authorised.
What to do:
- Complete all contact and delivery fields.
- Check that the postcode and delivery address are correct.
- Confirm that the payment information has been entered correctly.
- Try another payment method, browser or device.
- Take a screenshot of any error message if you need to contact us.
Incorrect Delivery Details Were Entered
Customers are responsible for checking their delivery information before placing an order.
What to do:
- Contact us immediately with your order number and correct address.
- We will update the details where possible if the order has not been dispatched.
- Once dispatched, we may not be able to change or redirect the delivery.
Instructions & Order Changes
I Forgot To Add Finish Instructions
You can tell us which areas should be raised, glossy or produced at different thickness levels.
What to do:
- Email orders@tpupatches.co.uk immediately.
- Include your order number and clear finish instructions.
- If production has not started, we will do our best to add them.
- If no instructions are supplied, our design team will choose the most suitable finish.
I Uploaded The Wrong Artwork Or Selected The Wrong Size
Custom TPU patches are produced using the artwork, size and details supplied with the order.
What to do:
- Contact us immediately with your order number.
- Do not place a duplicate order unless advised.
- If production has not started, we may be able to update the order.
- Once production has started, artwork and size changes may no longer be possible.
Artwork Will Not Upload
This may happen if the file is too large, unsupported or has not finished loading correctly.
What to do:
- Use a high-quality PNG, PDF, SVG, AI or EPS file.
- Check that the file is not unusually large.
- Refresh the page and upload the artwork again.
- Try using another browser or device.
- Avoid screenshots, blurry images or damaged files.
Background Removal Does Not Look Right
Automatic background removal may struggle with shadows, fine details, low-resolution images or similar colours between the artwork and background.
What to do:
- Upload a transparent PNG where possible.
- Check around small text, thin lines and detailed edges.
- Try using a higher-quality version of the artwork.
- Contact us before ordering if the artwork requires additional preparation.
Artwork Does Not Fit The Selected Size
This may happen when the artwork contains empty space or has different proportions from the selected size.
What to do:
- Turn on Keep Aspect Ratio to prevent stretching.
- Crop unnecessary empty space around the artwork.
- Resize the artwork within the available artboard.
- Choose a different finished size if required.
The Die-Cut Outline Looks Different Than Expected
The image outline and margin line are rough visual guides. They are not an exact production cut line.
What to do:
- Use the margin control to adjust the approximate space around the artwork.
- Use Show Image Outline to preview the expected shape.
- Keep important text and details away from the outside edge.
- Remember that our design team may refine the cut line to create a cleaner result.
Quantity Or Price Is Not Updating
The builder may need a moment to calculate the price after changes are made.
What to do:
- Confirm that a finished size has been selected.
- Enter the quantity in the correct quantity box.
- Click away from the box and allow the price to update.
- Refresh the builder and try again if nothing changes.
Design Will Not Add To Cart
This usually means that a required option has not been completed.
What to do:
- Make sure the artwork has finished uploading.
- Select a finished size and quantity.
- Check that the design is positioned inside the artboard.
- Read and tick any required confirmation box.
- Refresh the page and rebuild the design if the issue continues.
Checkout Will Not Complete
Checkout may not continue if required information is missing or the payment cannot be authorised.
What to do:
- Complete all contact and delivery fields.
- Check that the postcode and delivery address are correct.
- Confirm that the payment information has been entered correctly.
- Try another payment method, browser or device.
- Take a screenshot of any error message if you need to contact us.
Incorrect Delivery Details Were Entered
Customers are responsible for checking their delivery information before placing an order.
What to do:
- Contact us immediately with your order number and correct address.
- We will update the details where possible if the order has not been dispatched.
- Once dispatched, we may not be able to change or redirect the delivery.
I Forgot To Add Finish Instructions
You can tell us which areas should be raised, glossy or produced at different thickness levels.
What to do:
- Email orders@tpupatches.co.uk immediately.
- Include your order number and clear finish instructions.
- If production has not started, we will do our best to add them.
- If no instructions are supplied, our design team will choose the most suitable finish.
I Uploaded The Wrong Artwork Or Selected The Wrong Size
Custom TPU patches are produced using the artwork, size and details supplied with the order.
What to do:
- Contact us immediately with your order number.
- Do not place a duplicate order unless advised.
- If production has not started, we may be able to update the order.
- Once production has started, artwork and size changes may no longer be possible.
Still Need Help?
If you are having trouble with your TPU transfer, contact us before applying the rest of your order.